Harvard, Lebanon, and Pleasant Hill Sconces
The Harvard and New Lebanon sconces shown here have been reproduced in pine from examples made at the Harvard and New Lebanon community workshops. The Pleasant Hill sconce has been reproduced in cherry. You can use any of the woods mentioned above for satisfactory results.
Harvard and New Lebanon Sconces

Harvard Sconce layout
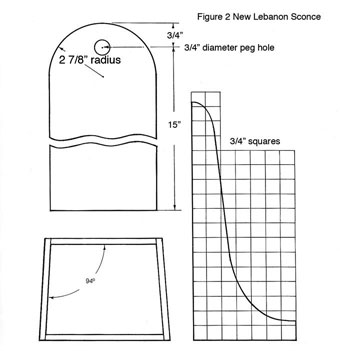
New Lebanon Sconce layout
All peg holes should be drilled out with a flat bit. The front edges of the base and sides of the Harvard sconce are sanded round by hand, blending the top edge of the sides flush with the recessed back. The edges on the New Lebanon sconce are square and only slightly dulled when finish sanding.
A very similar example from the same community can be seen in the Shaker collection at the American Museum in Bath. This has been made in butternut with all the upper edges rounded off. Such small variations in design were obviously tolerated by the Elders, so the choice is available.
Lay all pieces in position and check for fit before gluing and cramping. When set, clean up all surfaces with fine sandpaper, dulling any sharp edges ready for finishing.
Pleasant Hill Sconce
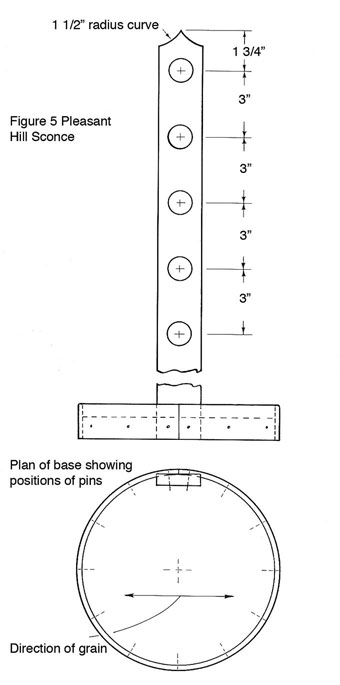
Pleasant Hill Sconce layout
Cut the side strip to length, then round off the top rim with a smoothing plane and sandpaper. An extra 1/2" has been included in the length to allow for bending. Immerse the strip in hot water and leave for approximately 2 hours. While this is soaking, bandsaw a 9 7/16" diameter disc from the center of a piece of scrapwood 11 13/16" square by 1 9/16" to 1 15/16" thick. The off-cuts will serve as cramps.
Wrap, the flexible soaked strip firmly round the disc then tighten up in the vice with the cramps. Leave to dry for a couple of days.
Place the now dry circular band round the base, mark off the overlap and cut to finished length. Using a 1/8" diameter bit, pre-drill the pin holes 3/4" up from the bottom edge. Sand the sides smooth before gluing and pinning, taking care to position the ends at the center of the rail back. Remove any surplus glue, sand the bottom flat and smooth, then dull the outer edge ready for finishing.
Very similar sconces with a one-piece base were produced at the Union Village community, Ohio. These have a thicker rim, formed by recessing the centre of the base on the lathe. If preferred, this method could be adopted as an alternative.
Finishing
Sconces were often stained an orange red before varnishing. However, both color and medium varied enormously depending on the location. The examples shown have been left their natural color, sealed with clear varnish, then rubbed down lightly with fine steel wool before wax polishing.
Pieces to Cut
| Harvard | 1 Back | 14 3/16" x 8 11/16" x 1/4" |
| 2 Sides | 9 3/4" x 4 5/8" x 1/4" | |
| 1 Base | 8 1/16" x 4 5/8" x 1/2" | |
| New Lebanon | 1 Back | 16 9/16" x 5 3/4" x 1/4" |
| 2 Sides | 13" x 5 1/2" x 1/4" | |
| 1 Base | 6 7/16" x 4 15/16" x 1/4" | |
| 1 Front | 6 1/2" x 1" x 1/4" | |
| Pleasant Hill | 1 Back | 24 7/8" x 2" x 1/2" |
| 1 Side | 29 1/8" x 1 1/4" x 3/16" | |
| 1 Base | 8 3/4" diameter x 1" |
Source: Adapted from a book by Barry Jackson