Bedstead at the Harriton House, Bryn Mawr, Pennsylvania
 Use this double half hitch knot to tie the rope to cross pieces
The bed on the ropes creates a certain atmosphere in the room, the game also has a very interesting atmosphere - far changing tides how long to beat.
 The direction of the rope is noted on the layout of the rope bed tying
Quarter inch hemp or sisal rope can be purchased in any hardware store. Measure between each of the pegs both from head to foot and side to side. Make sure you have enough rope for making the ties and shrinkage. It is best if you have an assistant to get the ropes as tight as possible. Make sure the rope is soaked in water overnight and dried prior to use. Now you are ready to begin.
 Rope bed direction from side to side.
Once you reach the last peg at the head of the board, wrap the rope around the upper left peg on the side rail. Stretch the rope to the right side rail and wrap over the first and second peg. Stretch the rope over the second and third peg on the left side rail. Repeat the process until you are at the lower left corner. Now you can wrap the rope over the last leg.
 An antique bed key is used to tighten the rope. In this photo, the bed key will be turned counterclockwise to tighten the second rope below the headboard.
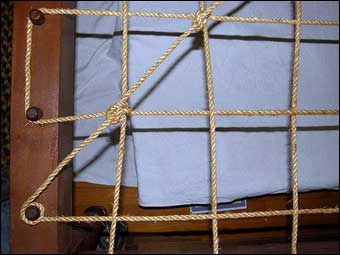 Completing the tying of rope using double half hitch knots at cross pieces.
If you ever have a chance to look at the pegs on a rope bed prior to roping the bed. take a look at the wear on each peg. Most likely you will see wear on each side of the pegs. This gives a false impression that the rope was wrapped around each peg individually. Following a layout this way puts too much pressure on each peg. Wrapping the rope around two pegs distributes the stress on the peg. In fact, when the bed was re-roped each time, the layout was started from the opposite end to equalize the stress so the pegs wouldn't be busted off. Carpenters were sometimes called on to replace broken pegs.
In colonial times the bed was covered with a feather mattress or on earlier beds a chaff bag filled with straw, corn husks especially in the South and beech leaves.If corn husks were used, some people would use the entire husk which would be cut and shredded into small pieces while still green. Because of the material used, various vermin including bed bugs were common in bedsteads. The rope would be removed each year the the housewife and boiled in a large kettle. If pests had infested the entire bedstead, a feather was dipped into kerosene and brushed into the crevices. This is where the phrase, "Sleep tight, don't let the bed bugs bite" started.
Rope began to be replaced by metal spring mattresses after 1840, although some people preferred rope because they thought the metal would attract lightning. The metal springs mattress certainly made sleeping more comfortable.
Don't be intimidated on how to rope that antique bed you find at auction this year. Nothing is more appropriate in a colonial house than an antique rope bed.
Source: Text, research and photos by Bryan Wright